 Can you believe we are three-quarters of the way through the year already? I know it’s cliche, but where on earth has the time gone?!! I had big plans for this year, especially with blogging, but as so often happens life just got a little too busy and I found some days just did not have enough hours for all that I wanted to achieve. Oh well, it’s never too late to improve on my time management skills and while I contemplate that feel free to check out some of my current favourites....
Major instagram crush
Serious ceramic LOVE
Cleverest DIY I have seen in a while
Bookmarking this, this and this for when the temperature soars
Strawberry and basil jam?…Um YES!
image
Can you believe we are three-quarters of the way through the year already? I know it’s cliche, but where on earth has the time gone?!! I had big plans for this year, especially with blogging, but as so often happens life just got a little too busy and I found some days just did not have enough hours for all that I wanted to achieve. Oh well, it’s never too late to improve on my time management skills and while I contemplate that feel free to check out some of my current favourites....
Major instagram crush
Serious ceramic LOVE
Cleverest DIY I have seen in a while
Bookmarking this, this and this for when the temperature soars
Strawberry and basil jam?…Um YES!
image


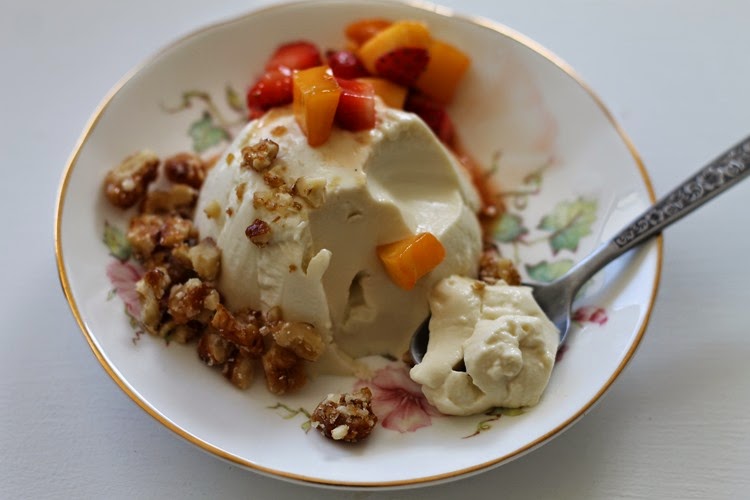 Guys can we just take a moment to appreciate these photos? I’m not normally one to blow my own trumpet but I must say I am rather impressed with how well they turned out! *blush I’m one of those people who spend more time than I care to admit ogling over the food photography in magazines, cookbooks and on the net and will admit to feeling more than a little intimidated at the high calibre set by other food bloggers but I gotta say, I think I may have brought my game…….finally, fingers crossed!
Anyway, moving right along. This dessert came about from having a jar of coconut milk, a lone lemon that had seen better days and some wilting thyme that needing using up and the ever so slight obsession I have developed for lemon, honey and thyme in a sweet dish. A few months ago I made Emm’s scrumptious ‘lemon, honey and thyme curd’ shortcakes (recipe in her cookbook) and was smitten with the sweet, earthy, zesty tang of these ingredients combined and have used every chance since to replicate the taste in various dishes. I’ve tested them in cake and biscuit form, in drink form – tea and smoothies and now dessert. The cake needs more work but I’ve been pretty happy with the other attempts.
Panna cotta is a rather decadent dessert that looks complicated but is really very simple and forgiving in nature. It’s a hard dessert to get wrong and the flavour combinations are only limited by your imagination.
Lemon & thyme panna cotta with lemon infused strawberry & mango salsa and honeyed walnut crumbs – serves 4
Ingredients: (panna cotta)
1 cup coconut milk
1 cup cream
4 sprigs of thyme
zest of one lemon
2 Tbsp honey
2 tsp gelatine
1/4 cup warm water
Ingredients: (lemon infused strawberry and mango salsa)
1/2 a small punnet of strawberries
1/2 medium mango
juice of one lemon
2 Tbsp sugar
Ingredients: (honeyed walnut crumbs)
1/2 cup walnut pieces – roughly chopped
1 Tbsp honey
Method:
For the panna cotta, place the warm water into a small dish and sprinkle over the gelatine. Mix gently then set aside for 5 minutes to absorb. Place the coconut milk, cream, thyme, zest and honey into a medium pot over low to medium heat. Stir while heating to dissolve the honey and then heat gently, about ten minutes just under a simmer, to allow the flavours of the lemon and thyme to infuse the milk/cream. Add the gelatine and whisk well to combine. Remove from the heat and strain into a bowl then divide between 4 x 1/2 cup ramekins/glasses. Refrigerate until set, around 5 hours or overnight.
For the salsa, place the lemon juice and sugar into a small pot and heat gently, stirring, to dissolve the sugar. Chop the strawberries and mango into small pieces and place in a bowl. Pour over the sweetened lemon juice and mix well to combine. Refrigerate until required but best prepared within an hour of eating.
For the walnut crumbs, place the walnuts and honey into a small fry pan and heat gently, stirring until the honey has dissolved and the walnuts are lightly toasted. Beware, this mix can burn easily. Once the walnuts are toasted place them onto a piece of baking paper or plate to cool. Once cool they can be stored in an airtight jar in the fridge.
To serve, unmold the panna cotta by dipping the ramekins in hot water and inverting onto a serving plate. If they are a little stuck simply run a knife around the edge. Spoon over the salsa then sprinkle over the walnut crumbs. Enjoy!
Notes:
- this could easily be made dairy free by using all coconut milk and/or cream (I did both versions on this particular occasion)
- I find panna cotta best made a day ahead
- if you prefer a sweeter dessert add another Tbsp of honey
- I used coconut sugar for the lemon syrup but any sugar will suffice
- infuse with whatever flavours tickle your fancy
Guys can we just take a moment to appreciate these photos? I’m not normally one to blow my own trumpet but I must say I am rather impressed with how well they turned out! *blush I’m one of those people who spend more time than I care to admit ogling over the food photography in magazines, cookbooks and on the net and will admit to feeling more than a little intimidated at the high calibre set by other food bloggers but I gotta say, I think I may have brought my game…….finally, fingers crossed!
Anyway, moving right along. This dessert came about from having a jar of coconut milk, a lone lemon that had seen better days and some wilting thyme that needing using up and the ever so slight obsession I have developed for lemon, honey and thyme in a sweet dish. A few months ago I made Emm’s scrumptious ‘lemon, honey and thyme curd’ shortcakes (recipe in her cookbook) and was smitten with the sweet, earthy, zesty tang of these ingredients combined and have used every chance since to replicate the taste in various dishes. I’ve tested them in cake and biscuit form, in drink form – tea and smoothies and now dessert. The cake needs more work but I’ve been pretty happy with the other attempts.
Panna cotta is a rather decadent dessert that looks complicated but is really very simple and forgiving in nature. It’s a hard dessert to get wrong and the flavour combinations are only limited by your imagination.
Lemon & thyme panna cotta with lemon infused strawberry & mango salsa and honeyed walnut crumbs – serves 4
Ingredients: (panna cotta)
1 cup coconut milk
1 cup cream
4 sprigs of thyme
zest of one lemon
2 Tbsp honey
2 tsp gelatine
1/4 cup warm water
Ingredients: (lemon infused strawberry and mango salsa)
1/2 a small punnet of strawberries
1/2 medium mango
juice of one lemon
2 Tbsp sugar
Ingredients: (honeyed walnut crumbs)
1/2 cup walnut pieces – roughly chopped
1 Tbsp honey
Method:
For the panna cotta, place the warm water into a small dish and sprinkle over the gelatine. Mix gently then set aside for 5 minutes to absorb. Place the coconut milk, cream, thyme, zest and honey into a medium pot over low to medium heat. Stir while heating to dissolve the honey and then heat gently, about ten minutes just under a simmer, to allow the flavours of the lemon and thyme to infuse the milk/cream. Add the gelatine and whisk well to combine. Remove from the heat and strain into a bowl then divide between 4 x 1/2 cup ramekins/glasses. Refrigerate until set, around 5 hours or overnight.
For the salsa, place the lemon juice and sugar into a small pot and heat gently, stirring, to dissolve the sugar. Chop the strawberries and mango into small pieces and place in a bowl. Pour over the sweetened lemon juice and mix well to combine. Refrigerate until required but best prepared within an hour of eating.
For the walnut crumbs, place the walnuts and honey into a small fry pan and heat gently, stirring until the honey has dissolved and the walnuts are lightly toasted. Beware, this mix can burn easily. Once the walnuts are toasted place them onto a piece of baking paper or plate to cool. Once cool they can be stored in an airtight jar in the fridge.
To serve, unmold the panna cotta by dipping the ramekins in hot water and inverting onto a serving plate. If they are a little stuck simply run a knife around the edge. Spoon over the salsa then sprinkle over the walnut crumbs. Enjoy!
Notes:
- this could easily be made dairy free by using all coconut milk and/or cream (I did both versions on this particular occasion)
- I find panna cotta best made a day ahead
- if you prefer a sweeter dessert add another Tbsp of honey
- I used coconut sugar for the lemon syrup but any sugar will suffice
- infuse with whatever flavours tickle your fancy
 I usually adore the winter months but find myself struggling with the cold this year. Spring cannot come soon enough for this usually cold season loving girl. That being said, we are still eating belly warming comfort food on a nightly basis despite the slight increase in mercury and I am still drinking copious cups of tea which I will miss once summer hits us full force! So I will grin and bare it for a little while longer…what choice do I have?
Here are some current favourites….
Totally blown away by the concept of a waste-free supermarket
Counting down the days till our trip home…seven weeks and counting
Crushing over these patterns and crocheting some winter warmers for said trip
Intrigued by the idea of these gluten-free buns
More determined than ever this year
image
I usually adore the winter months but find myself struggling with the cold this year. Spring cannot come soon enough for this usually cold season loving girl. That being said, we are still eating belly warming comfort food on a nightly basis despite the slight increase in mercury and I am still drinking copious cups of tea which I will miss once summer hits us full force! So I will grin and bare it for a little while longer…what choice do I have?
Here are some current favourites….
Totally blown away by the concept of a waste-free supermarket
Counting down the days till our trip home…seven weeks and counting
Crushing over these patterns and crocheting some winter warmers for said trip
Intrigued by the idea of these gluten-free buns
More determined than ever this year
image

 Winter has arrived with a scattering of rain but judging by the warmth of the last week you’d be forgiven for thinking otherwise. The seasons are rather strange here in Western Australia. The warmer months, which are excessively hot, seem to drag on f.o.r.e.v.e.r and a day while the cooler months that are over in the blink of an eye have ‘chill factor zero’ days that are somewhat few and far between. Talk about being ripped off! Give me hail and a bit of snow…..please? I want to hibernate for a week at least.
Despite what the mercury shows, porridge is on pretty high rotation in these parts. It’s only been in the last six months or so that I have started venturing away from traditional oat porridge in favour of other nutritious grains and while I enjoyed a bowl of porridge before I am well and truly head over heels for it now!
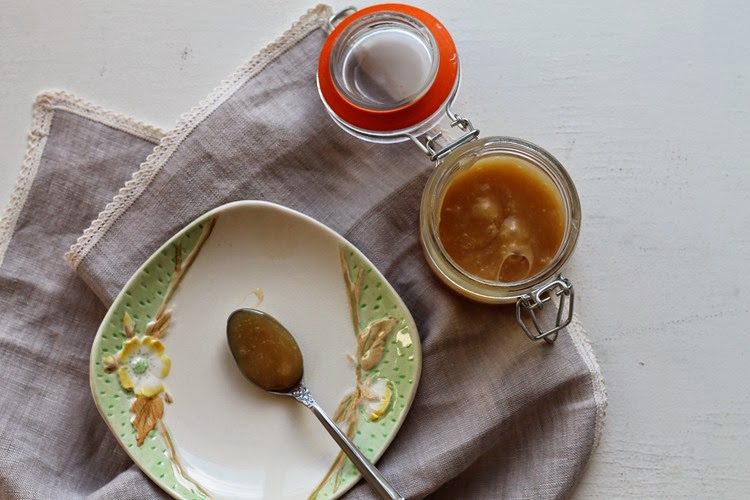
This banoffee buckwheat porridge, because who doesn’t love a dessert inspired breakfast, was inspired by Kelly’s creamy spiced version that we had a few weeks ago and fills the gap quite nicely with it’s nutty, creamy texture and subtly sweet fruity taste. Buckwheat does require a little forethought with soaking the groats overnight but the end result is so satisfying that it is well worth the effort.
Banoffee buckwheat porridge – serves 3-4
Ingredients: (porridge)
1 cup buckwheat groats – soaked in water with a Tbsp of apple cider vinegar overnight
1 cup coconut milk/cream
1/4 cup water
2 tsp coconut oil
1 tsp vanilla
2-4 fresh dates – depending on sweet preference, chopped finely
1 tsp cinnamon
pinch salt
2 bananas – one mashed, one sliced
small handful of chopped walnuts/nuts of choice
Ingredients: (caramel sauce)
1/4 cup coconut milk/cream
2 Tbsp rice syrup/honey
1 Tbsp coconut oil
Method:
Rinse off the buckwheat groats and place them into a pot with the remaining porridge ingredients (except the banana and nuts) and simmer gently over a medium heat for approximately 20 minutes, stirring occasionally. Once all the liquid has been absorbed, stir through the mashed banana and heat another minute or two.
While the porridge is cooking place the caramel sauce ingredients into a small pot and over a low heat simmer gently for 3-4 minutes, stirring often.
Place porridge into bowls, drizzle with caramel sauce then top with sliced banana and chopped nuts.
Notes:
- be adventurous and use this recipe as a starting point for other flavour combinations
- store any remaining caramel sauce in a small jar in the fridge for a few days, heating through before using
Winter has arrived with a scattering of rain but judging by the warmth of the last week you’d be forgiven for thinking otherwise. The seasons are rather strange here in Western Australia. The warmer months, which are excessively hot, seem to drag on f.o.r.e.v.e.r and a day while the cooler months that are over in the blink of an eye have ‘chill factor zero’ days that are somewhat few and far between. Talk about being ripped off! Give me hail and a bit of snow…..please? I want to hibernate for a week at least.
Despite what the mercury shows, porridge is on pretty high rotation in these parts. It’s only been in the last six months or so that I have started venturing away from traditional oat porridge in favour of other nutritious grains and while I enjoyed a bowl of porridge before I am well and truly head over heels for it now!
This banoffee buckwheat porridge, because who doesn’t love a dessert inspired breakfast, was inspired by Kelly’s creamy spiced version that we had a few weeks ago and fills the gap quite nicely with it’s nutty, creamy texture and subtly sweet fruity taste. Buckwheat does require a little forethought with soaking the groats overnight but the end result is so satisfying that it is well worth the effort.
Banoffee buckwheat porridge – serves 3-4
Ingredients: (porridge)
1 cup buckwheat groats – soaked in water with a Tbsp of apple cider vinegar overnight
1 cup coconut milk/cream
1/4 cup water
2 tsp coconut oil
1 tsp vanilla
2-4 fresh dates – depending on sweet preference, chopped finely
1 tsp cinnamon
pinch salt
2 bananas – one mashed, one sliced
small handful of chopped walnuts/nuts of choice
Ingredients: (caramel sauce)
1/4 cup coconut milk/cream
2 Tbsp rice syrup/honey
1 Tbsp coconut oil
Method:
Rinse off the buckwheat groats and place them into a pot with the remaining porridge ingredients (except the banana and nuts) and simmer gently over a medium heat for approximately 20 minutes, stirring occasionally. Once all the liquid has been absorbed, stir through the mashed banana and heat another minute or two.
While the porridge is cooking place the caramel sauce ingredients into a small pot and over a low heat simmer gently for 3-4 minutes, stirring often.
Place porridge into bowls, drizzle with caramel sauce then top with sliced banana and chopped nuts.
Notes:
- be adventurous and use this recipe as a starting point for other flavour combinations
- store any remaining caramel sauce in a small jar in the fridge for a few days, heating through before using


 In her younger days, my mum was never very adventurous when it came to cooking. Yes, she cooked everything from scratch but tended to stick to a handful of tried and trusted meals which we had on high rotation. I think trying to satisfy the fussy needs of her six children put her off extending her recipe repertoire. Curry wasn’t something we had very often and when we did it was good old curry sausages or eggs made in a white curry sauce (white sauce and curry powder) *yuk! I should add that as a child I disliked both eggs and sausages so those meal times were a test of my mothers patience and my will power.
As us kids grew older mum did start expanding on her culinary efforts, she makes a mean thai chilli chicken dish, but the running joke when we now come together as a family is just how bad her cooking was. Unlike my mum I tend to follow in my fathers footsteps when it comes to cooking and am not afraid to experiment and push the boundaries. That said, I do know what it’s like to cook for a fuss pot or two so can empathise with what my mum had to deal with but by the same token, I always encourage our children to try something at least once before they turn their noses up at it and I don't allow their fussy tendencies, which change on any given day, to dictate what I cook - bad mother!
Gone are the days of a white sauce based curry, I left that behind with my childhood. These days I’m all about a homemade curry paste that allows me the flexibility to tweak the flavours to suit whatever ingredients I have on hand. The beauty of a curry dish is that it is versatile, hearty and a one pot meal that is super simple and fast to make…win/win in my books.
Eggplant and capsicum curry – serves 2-3
Ingredients: (curry)
1 small eggplant – diced
1 choko – peeled and diced
1/2 each of a red, yellow and green capsicum – diced
1.5 cups coconut milk/cream
1 tsp coconut oil/ghee
2 Tbsp curry paste – recipe below
cauliflower rice/rice of choice/quinoa to accompany
Ingredients: (curry paste)
2 Tbsp coriander seeds
1 Tbsp cumin seeds
1 tsp fennel seeds
1 tsp mustard seeds
1/2 tsp peppercorns
1 tsp Himalayan/rock salt
1-2 fresh chillies – chopped - can use 1-2 tsp chilli flakes
3 cloves garlic – crushed
1/2 onion – finely diced
1 cm piece each of grated tumeric and ginger - can use 1 tsp each of ground
1 Tbsp apple cider vinegar
Method:
For the paste, place the seeds and peppercorns into a dry frypan and toast gently, swirling the pan often, over medium heat until fragrant and starting to brown. Remove from the heat and allow to cool a few minutes. Add the seeds to a mortar and pestle with the salt and grind till fine. Add the remaining paste ingredients to the mortar and pestle and continue to grind until you have a somewhat smooth paste.
For the curry, heat the coconut oil/ghee over medium heat. Add the curry paste and cook, stirring, for a minute or so. Pour in the coconut milk/cream and the vegetables and turn down to a gentle simmer. Cover and simmer for 10-12 minutes until the vegetables are tender then serve in bowls with quinoa or rice of choice.
Notes:
- diced or tinned tomato can be used as a base instead of coconut milk/cream
- use whatever vegetables you have on hand, sweet potato and spinach is a particular favourite
- beans or chickpeas are a nice addition as is finely sliced cooked beef or chicken strips
- I tend to use the whole amount of curry paste above if I am cooking for my entire family of ten and up the vegetables and liquid accordingly but if I am making enough for 2-3 serves, I generally put any remaining paste into a small glass jar and cover with a thin layer of olive oil before lidding and refridgerating for up to a week
- use more or less chillies depending on the amount of heat you can tolerate
- serve alongside naan and greek yoghurt for a more substantial meal
- don't let the amount of ingredients in the paste intimidate you, it's well worth the effort of making your own paste
In her younger days, my mum was never very adventurous when it came to cooking. Yes, she cooked everything from scratch but tended to stick to a handful of tried and trusted meals which we had on high rotation. I think trying to satisfy the fussy needs of her six children put her off extending her recipe repertoire. Curry wasn’t something we had very often and when we did it was good old curry sausages or eggs made in a white curry sauce (white sauce and curry powder) *yuk! I should add that as a child I disliked both eggs and sausages so those meal times were a test of my mothers patience and my will power.
As us kids grew older mum did start expanding on her culinary efforts, she makes a mean thai chilli chicken dish, but the running joke when we now come together as a family is just how bad her cooking was. Unlike my mum I tend to follow in my fathers footsteps when it comes to cooking and am not afraid to experiment and push the boundaries. That said, I do know what it’s like to cook for a fuss pot or two so can empathise with what my mum had to deal with but by the same token, I always encourage our children to try something at least once before they turn their noses up at it and I don't allow their fussy tendencies, which change on any given day, to dictate what I cook - bad mother!
Gone are the days of a white sauce based curry, I left that behind with my childhood. These days I’m all about a homemade curry paste that allows me the flexibility to tweak the flavours to suit whatever ingredients I have on hand. The beauty of a curry dish is that it is versatile, hearty and a one pot meal that is super simple and fast to make…win/win in my books.
Eggplant and capsicum curry – serves 2-3
Ingredients: (curry)
1 small eggplant – diced
1 choko – peeled and diced
1/2 each of a red, yellow and green capsicum – diced
1.5 cups coconut milk/cream
1 tsp coconut oil/ghee
2 Tbsp curry paste – recipe below
cauliflower rice/rice of choice/quinoa to accompany
Ingredients: (curry paste)
2 Tbsp coriander seeds
1 Tbsp cumin seeds
1 tsp fennel seeds
1 tsp mustard seeds
1/2 tsp peppercorns
1 tsp Himalayan/rock salt
1-2 fresh chillies – chopped - can use 1-2 tsp chilli flakes
3 cloves garlic – crushed
1/2 onion – finely diced
1 cm piece each of grated tumeric and ginger - can use 1 tsp each of ground
1 Tbsp apple cider vinegar
Method:
For the paste, place the seeds and peppercorns into a dry frypan and toast gently, swirling the pan often, over medium heat until fragrant and starting to brown. Remove from the heat and allow to cool a few minutes. Add the seeds to a mortar and pestle with the salt and grind till fine. Add the remaining paste ingredients to the mortar and pestle and continue to grind until you have a somewhat smooth paste.
For the curry, heat the coconut oil/ghee over medium heat. Add the curry paste and cook, stirring, for a minute or so. Pour in the coconut milk/cream and the vegetables and turn down to a gentle simmer. Cover and simmer for 10-12 minutes until the vegetables are tender then serve in bowls with quinoa or rice of choice.
Notes:
- diced or tinned tomato can be used as a base instead of coconut milk/cream
- use whatever vegetables you have on hand, sweet potato and spinach is a particular favourite
- beans or chickpeas are a nice addition as is finely sliced cooked beef or chicken strips
- I tend to use the whole amount of curry paste above if I am cooking for my entire family of ten and up the vegetables and liquid accordingly but if I am making enough for 2-3 serves, I generally put any remaining paste into a small glass jar and cover with a thin layer of olive oil before lidding and refridgerating for up to a week
- use more or less chillies depending on the amount of heat you can tolerate
- serve alongside naan and greek yoghurt for a more substantial meal
- don't let the amount of ingredients in the paste intimidate you, it's well worth the effort of making your own paste


