
 Things have been a little hectic this week as I prepare to leave for New Zealand next Tuesday. In between the end of term school events/birthday parties/play dates and shopping for supplies for my men-folk who’ll be staying back, I’ve been trying to squeeze in the odd cuppa with friends, complete some sewing orders and prepare a few freezer meals on top of spring cleaning our home and of course pack. It’s daft to be trying to do so much before I leave but I seem to work better under pressure and to be honest, I could do with the distraction. It’s been a few years since I’ve travelled home and even longer since our youngest three were there so you can well imagine the excitement that is building.
When I know I have a busy schedule ahead of me I opt to keep our meals fairly light and simple and prepare what I can ahead of time. This allows me to throw a salad, such as this one, together in mere minutes. The thing I love about a salad like this is that it is a great base for other flavours and ingredients depending on what you have on hand. Don’t be afraid to play around and make it your own.
Roasted kumara, beet and quinoa salad with an orange-tahini dressing – serves 2-3 as a main or 4-6 as a side
Ingredients: (salad)
1 cup quinoa
2 beetroot – peeled and chopped into cubes
1 medium kumara (sweet potato) peeled and chopped into cubes
1 Tbsp olive oil
handful parsley – chopped finely
toasted walnuts – chopped roughly
1/2 cup of orange-tahini dressing
Ingredients: (dressing) – makes 3/4 cup
juice and zest of 1 orange (1/2 cup juice/2 tsp zest)
3 Tbsp tahini
1 Tbsp sweetener of choice
1 Tbsp apple cider vinegar
1 Tbsp olive oil
salt & pepper
Method:
Preheat oven to 180°. Toss the cubed kumara and beets in oil and place on a baking tray. Bake for 15-20 minutes until golden and tender.
In a pot bring 2 cups of water to the boil. Rinse the quinoa in a sieve under running water and leave to drain. Once the water is boiling, add the quinoa to the pot, cover and reduce the heat to a simmer. Cook the quinoa for approximately 12 minutes. (Quinoa is cooked when it has swelled, becomes translucent and has a little tail sprout on the end of it) Once cooked fluff up with a fork and set aside to cool.
Shake the dressing ingredients together in a jar until well combined and creamy.
Add the quinoa to a bowl with roasted veggies, chopped parsley, nuts and the dressing and toss gently to combine.
Notes:
- left over dressing is delicious drizzled over porridge or a fresh fruit salad or stirred through greek yoghurt (if tolerated*)
- any roasted vegetables work well in a salad like this. zucchini, tomatoes and eggplant are particular favourites
- use whatever fresh herbs you have on hand. mint and coriander are a wonderful addition
- crumbed feta* rounds out the flavours beautifully
- substitute lemon for the orange for a more zesty dressing
- freshly grated ginger and chopped garlic give a lovely zing to the dressing as does ground cumin - use in 1 tsp amounts
- any lightly toasted nuts and seeds go well with salads like this
- serve on a bed of mixed salad leaves or wilted spinach/kale for a more substantial meal
- great side to bbq/grilled/roasted meat or salmon
Things have been a little hectic this week as I prepare to leave for New Zealand next Tuesday. In between the end of term school events/birthday parties/play dates and shopping for supplies for my men-folk who’ll be staying back, I’ve been trying to squeeze in the odd cuppa with friends, complete some sewing orders and prepare a few freezer meals on top of spring cleaning our home and of course pack. It’s daft to be trying to do so much before I leave but I seem to work better under pressure and to be honest, I could do with the distraction. It’s been a few years since I’ve travelled home and even longer since our youngest three were there so you can well imagine the excitement that is building.
When I know I have a busy schedule ahead of me I opt to keep our meals fairly light and simple and prepare what I can ahead of time. This allows me to throw a salad, such as this one, together in mere minutes. The thing I love about a salad like this is that it is a great base for other flavours and ingredients depending on what you have on hand. Don’t be afraid to play around and make it your own.
Roasted kumara, beet and quinoa salad with an orange-tahini dressing – serves 2-3 as a main or 4-6 as a side
Ingredients: (salad)
1 cup quinoa
2 beetroot – peeled and chopped into cubes
1 medium kumara (sweet potato) peeled and chopped into cubes
1 Tbsp olive oil
handful parsley – chopped finely
toasted walnuts – chopped roughly
1/2 cup of orange-tahini dressing
Ingredients: (dressing) – makes 3/4 cup
juice and zest of 1 orange (1/2 cup juice/2 tsp zest)
3 Tbsp tahini
1 Tbsp sweetener of choice
1 Tbsp apple cider vinegar
1 Tbsp olive oil
salt & pepper
Method:
Preheat oven to 180°. Toss the cubed kumara and beets in oil and place on a baking tray. Bake for 15-20 minutes until golden and tender.
In a pot bring 2 cups of water to the boil. Rinse the quinoa in a sieve under running water and leave to drain. Once the water is boiling, add the quinoa to the pot, cover and reduce the heat to a simmer. Cook the quinoa for approximately 12 minutes. (Quinoa is cooked when it has swelled, becomes translucent and has a little tail sprout on the end of it) Once cooked fluff up with a fork and set aside to cool.
Shake the dressing ingredients together in a jar until well combined and creamy.
Add the quinoa to a bowl with roasted veggies, chopped parsley, nuts and the dressing and toss gently to combine.
Notes:
- left over dressing is delicious drizzled over porridge or a fresh fruit salad or stirred through greek yoghurt (if tolerated*)
- any roasted vegetables work well in a salad like this. zucchini, tomatoes and eggplant are particular favourites
- use whatever fresh herbs you have on hand. mint and coriander are a wonderful addition
- crumbed feta* rounds out the flavours beautifully
- substitute lemon for the orange for a more zesty dressing
- freshly grated ginger and chopped garlic give a lovely zing to the dressing as does ground cumin - use in 1 tsp amounts
- any lightly toasted nuts and seeds go well with salads like this
- serve on a bed of mixed salad leaves or wilted spinach/kale for a more substantial meal
- great side to bbq/grilled/roasted meat or salmon

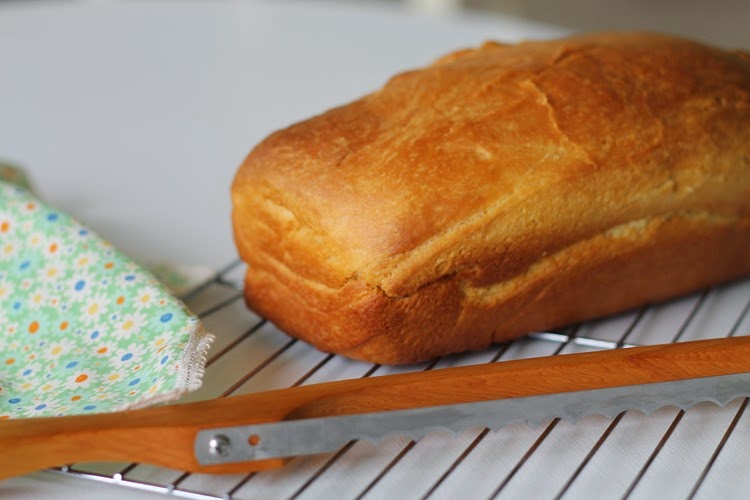

 I kind of put my foot in it last week. I was bragging about how amazing a brioche loaf would be in a request for bread and butter pudding without even knowing how to make brioche. I’m certainly not new to bread making, I used to make bread by hand on a regular basis until I found out I am gluten intolerant and it lost it's appeal, so I thought to myself ‘how hard can it be?’ Have you ever made brioche? Well let me tell you that it would be a piece of cake if you have a mixer of some sort but to make it by hand takes c o m m i t t m e n t ! It’s messy, time consuming and somewhat tiring!! Don’t be put off by the messy hard work though, the rhythmic kneading action is kind of therapeutic and the mix does eventually come together into a soft, smooth, pliable dough. I'm also told that the effort I went to was well worth it *wink
This brioche was used to make the most luxurious bread and butter pudding – recipe coming soon, and I think it would make an equally delectable french toast.
Brioche – makes one large or two small loaves
(recipe from Gourmet Traveller but the method is my own)
Ingredients:
160ml warm milk
1 1/2 tsp yeast
5 egg yolks – lightly beaten
375g flour, plus extra for dusting
30g sugar
150g butter – cubed
1 egg – egg wash
Method:
Sprinkle the yeast over half of the milk and mix gently. Set aside till frothy, approximately 5 minutes. Whisk egg yolks into the remaining milk and set aside.
Mix the dry ingredients in a large bowl then pour in both the yeast and yolk mixtures and mix till well combined and dough like. Tip out onto a lightly floured bench and knead for approximately 10 mins. Once you have a nice dough, flatten out and place half of the cubed butter on one side of the dough then fold the remaining dough over the top of the butter. This gets messy but you need to work the butter into the dough. Knead the dough, working the butter in, till it is well combined and then repeat with the remaining butter. Trust me, it does come together but requires a good 15-20 mins of vigorous kneading.
Once you have a nice smooth dough place it into a butter bowl, cover and leave to rise until doubled in size. Once doubled, gently fold the dough over on itself a few times then cling wrap and place in the fridge overnight.
In the morning remove the dough from the fridge and allow to come to room temperature before placing into a lined loaf tin (this is where you can divide the dough to make two loaves). Leave the dough to rise for a second time. Preheat oven 180° and brush the loaf/loaves with the egg wash. Bake for 45-50 minutes until golden brown and hollow sounding when tapped. Cool briefly in the tin before turning out onto a wire rack.
I kind of put my foot in it last week. I was bragging about how amazing a brioche loaf would be in a request for bread and butter pudding without even knowing how to make brioche. I’m certainly not new to bread making, I used to make bread by hand on a regular basis until I found out I am gluten intolerant and it lost it's appeal, so I thought to myself ‘how hard can it be?’ Have you ever made brioche? Well let me tell you that it would be a piece of cake if you have a mixer of some sort but to make it by hand takes c o m m i t t m e n t ! It’s messy, time consuming and somewhat tiring!! Don’t be put off by the messy hard work though, the rhythmic kneading action is kind of therapeutic and the mix does eventually come together into a soft, smooth, pliable dough. I'm also told that the effort I went to was well worth it *wink
This brioche was used to make the most luxurious bread and butter pudding – recipe coming soon, and I think it would make an equally delectable french toast.
Brioche – makes one large or two small loaves
(recipe from Gourmet Traveller but the method is my own)
Ingredients:
160ml warm milk
1 1/2 tsp yeast
5 egg yolks – lightly beaten
375g flour, plus extra for dusting
30g sugar
150g butter – cubed
1 egg – egg wash
Method:
Sprinkle the yeast over half of the milk and mix gently. Set aside till frothy, approximately 5 minutes. Whisk egg yolks into the remaining milk and set aside.
Mix the dry ingredients in a large bowl then pour in both the yeast and yolk mixtures and mix till well combined and dough like. Tip out onto a lightly floured bench and knead for approximately 10 mins. Once you have a nice dough, flatten out and place half of the cubed butter on one side of the dough then fold the remaining dough over the top of the butter. This gets messy but you need to work the butter into the dough. Knead the dough, working the butter in, till it is well combined and then repeat with the remaining butter. Trust me, it does come together but requires a good 15-20 mins of vigorous kneading.
Once you have a nice smooth dough place it into a butter bowl, cover and leave to rise until doubled in size. Once doubled, gently fold the dough over on itself a few times then cling wrap and place in the fridge overnight.
In the morning remove the dough from the fridge and allow to come to room temperature before placing into a lined loaf tin (this is where you can divide the dough to make two loaves). Leave the dough to rise for a second time. Preheat oven 180° and brush the loaf/loaves with the egg wash. Bake for 45-50 minutes until golden brown and hollow sounding when tapped. Cool briefly in the tin before turning out onto a wire rack.
 Can you believe we are three-quarters of the way through the year already? I know it’s cliche, but where on earth has the time gone?!! I had big plans for this year, especially with blogging, but as so often happens life just got a little too busy and I found some days just did not have enough hours for all that I wanted to achieve. Oh well, it’s never too late to improve on my time management skills and while I contemplate that feel free to check out some of my current favourites....
Major instagram crush
Serious ceramic LOVE
Cleverest DIY I have seen in a while
Bookmarking this, this and this for when the temperature soars
Strawberry and basil jam?…Um YES!
image
Can you believe we are three-quarters of the way through the year already? I know it’s cliche, but where on earth has the time gone?!! I had big plans for this year, especially with blogging, but as so often happens life just got a little too busy and I found some days just did not have enough hours for all that I wanted to achieve. Oh well, it’s never too late to improve on my time management skills and while I contemplate that feel free to check out some of my current favourites....
Major instagram crush
Serious ceramic LOVE
Cleverest DIY I have seen in a while
Bookmarking this, this and this for when the temperature soars
Strawberry and basil jam?…Um YES!
image


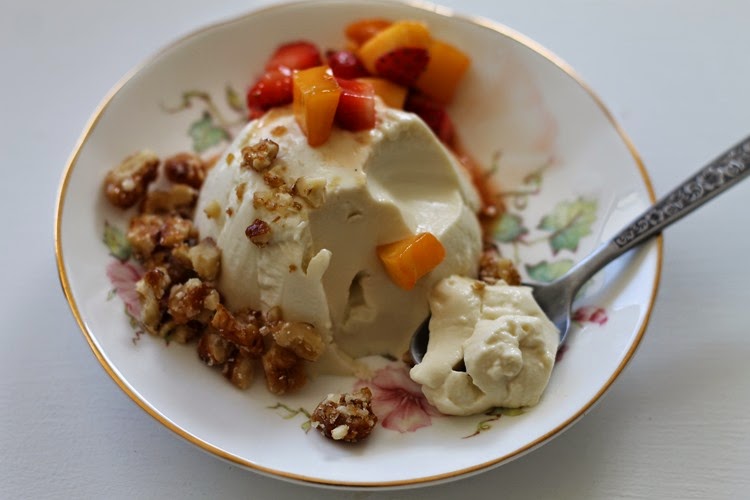 Guys can we just take a moment to appreciate these photos? I’m not normally one to blow my own trumpet but I must say I am rather impressed with how well they turned out! *blush I’m one of those people who spend more time than I care to admit ogling over the food photography in magazines, cookbooks and on the net and will admit to feeling more than a little intimidated at the high calibre set by other food bloggers but I gotta say, I think I may have brought my game…….finally, fingers crossed!
Anyway, moving right along. This dessert came about from having a jar of coconut milk, a lone lemon that had seen better days and some wilting thyme that needing using up and the ever so slight obsession I have developed for lemon, honey and thyme in a sweet dish. A few months ago I made Emm’s scrumptious ‘lemon, honey and thyme curd’ shortcakes (recipe in her cookbook) and was smitten with the sweet, earthy, zesty tang of these ingredients combined and have used every chance since to replicate the taste in various dishes. I’ve tested them in cake and biscuit form, in drink form – tea and smoothies and now dessert. The cake needs more work but I’ve been pretty happy with the other attempts.
Panna cotta is a rather decadent dessert that looks complicated but is really very simple and forgiving in nature. It’s a hard dessert to get wrong and the flavour combinations are only limited by your imagination.
Lemon & thyme panna cotta with lemon infused strawberry & mango salsa and honeyed walnut crumbs – serves 4
Ingredients: (panna cotta)
1 cup coconut milk
1 cup cream
4 sprigs of thyme
zest of one lemon
2 Tbsp honey
2 tsp gelatine
1/4 cup warm water
Ingredients: (lemon infused strawberry and mango salsa)
1/2 a small punnet of strawberries
1/2 medium mango
juice of one lemon
2 Tbsp sugar
Ingredients: (honeyed walnut crumbs)
1/2 cup walnut pieces – roughly chopped
1 Tbsp honey
Method:
For the panna cotta, place the warm water into a small dish and sprinkle over the gelatine. Mix gently then set aside for 5 minutes to absorb. Place the coconut milk, cream, thyme, zest and honey into a medium pot over low to medium heat. Stir while heating to dissolve the honey and then heat gently, about ten minutes just under a simmer, to allow the flavours of the lemon and thyme to infuse the milk/cream. Add the gelatine and whisk well to combine. Remove from the heat and strain into a bowl then divide between 4 x 1/2 cup ramekins/glasses. Refrigerate until set, around 5 hours or overnight.
For the salsa, place the lemon juice and sugar into a small pot and heat gently, stirring, to dissolve the sugar. Chop the strawberries and mango into small pieces and place in a bowl. Pour over the sweetened lemon juice and mix well to combine. Refrigerate until required but best prepared within an hour of eating.
For the walnut crumbs, place the walnuts and honey into a small fry pan and heat gently, stirring until the honey has dissolved and the walnuts are lightly toasted. Beware, this mix can burn easily. Once the walnuts are toasted place them onto a piece of baking paper or plate to cool. Once cool they can be stored in an airtight jar in the fridge.
To serve, unmold the panna cotta by dipping the ramekins in hot water and inverting onto a serving plate. If they are a little stuck simply run a knife around the edge. Spoon over the salsa then sprinkle over the walnut crumbs. Enjoy!
Notes:
- this could easily be made dairy free by using all coconut milk and/or cream (I did both versions on this particular occasion)
- I find panna cotta best made a day ahead
- if you prefer a sweeter dessert add another Tbsp of honey
- I used coconut sugar for the lemon syrup but any sugar will suffice
- infuse with whatever flavours tickle your fancy
Guys can we just take a moment to appreciate these photos? I’m not normally one to blow my own trumpet but I must say I am rather impressed with how well they turned out! *blush I’m one of those people who spend more time than I care to admit ogling over the food photography in magazines, cookbooks and on the net and will admit to feeling more than a little intimidated at the high calibre set by other food bloggers but I gotta say, I think I may have brought my game…….finally, fingers crossed!
Anyway, moving right along. This dessert came about from having a jar of coconut milk, a lone lemon that had seen better days and some wilting thyme that needing using up and the ever so slight obsession I have developed for lemon, honey and thyme in a sweet dish. A few months ago I made Emm’s scrumptious ‘lemon, honey and thyme curd’ shortcakes (recipe in her cookbook) and was smitten with the sweet, earthy, zesty tang of these ingredients combined and have used every chance since to replicate the taste in various dishes. I’ve tested them in cake and biscuit form, in drink form – tea and smoothies and now dessert. The cake needs more work but I’ve been pretty happy with the other attempts.
Panna cotta is a rather decadent dessert that looks complicated but is really very simple and forgiving in nature. It’s a hard dessert to get wrong and the flavour combinations are only limited by your imagination.
Lemon & thyme panna cotta with lemon infused strawberry & mango salsa and honeyed walnut crumbs – serves 4
Ingredients: (panna cotta)
1 cup coconut milk
1 cup cream
4 sprigs of thyme
zest of one lemon
2 Tbsp honey
2 tsp gelatine
1/4 cup warm water
Ingredients: (lemon infused strawberry and mango salsa)
1/2 a small punnet of strawberries
1/2 medium mango
juice of one lemon
2 Tbsp sugar
Ingredients: (honeyed walnut crumbs)
1/2 cup walnut pieces – roughly chopped
1 Tbsp honey
Method:
For the panna cotta, place the warm water into a small dish and sprinkle over the gelatine. Mix gently then set aside for 5 minutes to absorb. Place the coconut milk, cream, thyme, zest and honey into a medium pot over low to medium heat. Stir while heating to dissolve the honey and then heat gently, about ten minutes just under a simmer, to allow the flavours of the lemon and thyme to infuse the milk/cream. Add the gelatine and whisk well to combine. Remove from the heat and strain into a bowl then divide between 4 x 1/2 cup ramekins/glasses. Refrigerate until set, around 5 hours or overnight.
For the salsa, place the lemon juice and sugar into a small pot and heat gently, stirring, to dissolve the sugar. Chop the strawberries and mango into small pieces and place in a bowl. Pour over the sweetened lemon juice and mix well to combine. Refrigerate until required but best prepared within an hour of eating.
For the walnut crumbs, place the walnuts and honey into a small fry pan and heat gently, stirring until the honey has dissolved and the walnuts are lightly toasted. Beware, this mix can burn easily. Once the walnuts are toasted place them onto a piece of baking paper or plate to cool. Once cool they can be stored in an airtight jar in the fridge.
To serve, unmold the panna cotta by dipping the ramekins in hot water and inverting onto a serving plate. If they are a little stuck simply run a knife around the edge. Spoon over the salsa then sprinkle over the walnut crumbs. Enjoy!
Notes:
- this could easily be made dairy free by using all coconut milk and/or cream (I did both versions on this particular occasion)
- I find panna cotta best made a day ahead
- if you prefer a sweeter dessert add another Tbsp of honey
- I used coconut sugar for the lemon syrup but any sugar will suffice
- infuse with whatever flavours tickle your fancy
 I usually adore the winter months but find myself struggling with the cold this year. Spring cannot come soon enough for this usually cold season loving girl. That being said, we are still eating belly warming comfort food on a nightly basis despite the slight increase in mercury and I am still drinking copious cups of tea which I will miss once summer hits us full force! So I will grin and bare it for a little while longer…what choice do I have?
Here are some current favourites….
Totally blown away by the concept of a waste-free supermarket
Counting down the days till our trip home…seven weeks and counting
Crushing over these patterns and crocheting some winter warmers for said trip
Intrigued by the idea of these gluten-free buns
More determined than ever this year
image
I usually adore the winter months but find myself struggling with the cold this year. Spring cannot come soon enough for this usually cold season loving girl. That being said, we are still eating belly warming comfort food on a nightly basis despite the slight increase in mercury and I am still drinking copious cups of tea which I will miss once summer hits us full force! So I will grin and bare it for a little while longer…what choice do I have?
Here are some current favourites….
Totally blown away by the concept of a waste-free supermarket
Counting down the days till our trip home…seven weeks and counting
Crushing over these patterns and crocheting some winter warmers for said trip
Intrigued by the idea of these gluten-free buns
More determined than ever this year
image


